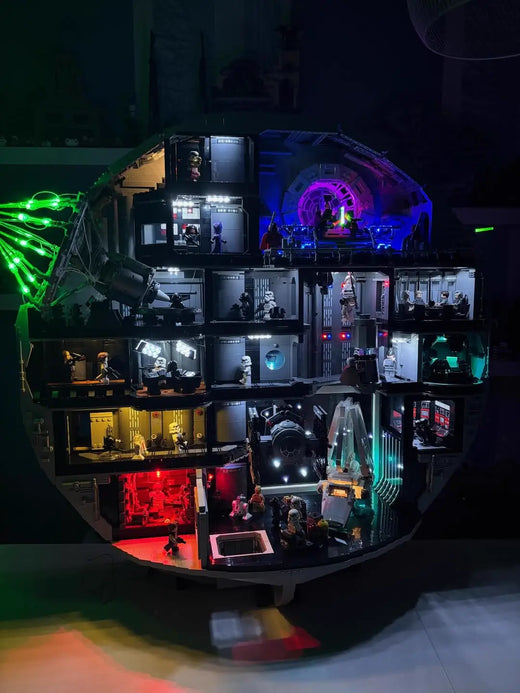
A LEGO Death Star light kit has two jobs: reveal the interior rooms and preserve the dark mass of the station. If every section receives the same brightness, the model becomes visually flat. A stronger AFOL display uses layers—small interior points, a controlled superlaser effect and enough shadow to keep the sphere readable.

Plan the lighting zones first
Divide the model into three zones before installing anything:
- Exterior: restrained light that defines the silhouette.
- Interior rooms: local light sources that separate one scene from another.
- Hero effects: the superlaser, hangar and key command areas.
This prevents the brightest component from dominating every angle.
Route wires like part of the build
Follow structural seams and existing channels. Keep connectors near areas that can be reopened without dismantling half the model. Test each branch before closing the next room, and leave a small service loop where a section may need maintenance.
Do not force a plate over a cable. If a connection creates pressure, reroute it. A clean installation should not change the geometry of the LEGO elements.
Control colour and brightness
Cooler white or blue light suits technical corridors and exterior systems. Warmer light can help rooms with characters or mechanical detail feel distinct. Green should remain concentrated around the superlaser. The contrast between zones is what makes the cutaway structure readable.

Place the finished model carefully
Use a shelf deep enough for airflow, cable access and a stable three-quarter viewing angle. A dark background strengthens the outline. Keep the controller accessible so the model can be switched off without moving the set.
AFOL verdict
The Death Star benefits from lighting more than most display sets because much of its storytelling sits inside the structure. Plan the zones, hide the wiring and keep some shadow. The result will feel larger and more cinematic without looking overlit.