LEGO Modular Building Lighting: Illuminating Your City Brick by Brick

AUgust 21,2025

You’ve spent hours building a masterpiece, maybe the Police Station or the Bookshop, and it looks fantastic. But what if you could take it to the next level? Adding lights transforms a great model into a breathtakingly realistic piece of art. It’s not just about brightness; it’s about bringing your LEGO creation to life. This guide will walk you through illuminating your collection of modular buildings, making them shine, brick by brick.

Table of contents

  1. Adding lights to your LEGO modular buildings can really make them stand out and look more realistic.
  2. There are specific kits designed for LEGO modular sets that make installation easier.
  3. Proper planning is important for placing lights and hiding wires so your build still looks neat.
  4. Troubleshooting common issues like lights not working or uneven brightness is part of the process.
  5. You can get creative with advanced techniques and even integrate technology for dynamic lighting effects.

Illuminating Your LEGO Modular Cityscape

So, you’ve spent hours, maybe even days, putting together your LEGO modular buildings. They look great, right? But have you ever thought about what happens after the last brick is placed? That’s where lighting comes in, and let me tell you, it’s a game-changer. It’s not just about making things bright; it’s about adding that extra layer of realism and character that really makes your LEGO city feel alive. Think about it – a street scene at night, with warm light spilling from windows and streetlights casting long shadows. That’s the kind of atmosphere lighting can create.

Enhancing Detail with LEGO Modular Lighting

Modular buildings are packed with incredible details, from tiny shop signs to the furniture inside apartments. Our lights make those details pop. You can highlight the intricate facade of the LEGO Modular Police Station or draw attention to the cozy interior of the Bookshop. It’s like giving your build a spotlight, showing off all the hard work you put into it.

Bringing Your LEGO Creations to Life

Honestly, a LEGO city without lights feels a bit… static. It’s like a movie set before the cameras roll. Adding lights, though? That’s when the magic happens. You can create a whole mood. Imagine a busy street scene with different colored lights, or a quiet residential area with soft, warm glows. It transforms your collection from a display of plastic bricks into a miniature world that feels lived-in and dynamic. It really makes you appreciate the creativity that goes into these sets.

The Impact of Color in LEGO Lighting

Color is a big deal when you're thinking about lighting. You can use warm yellows and oranges to make a building feel cozy and inviting, like a little cafe on a cold evening. Or, you could go with cooler blues and whites for a more modern or futuristic look, maybe for a tech store or a police station. Even subtle color changes can completely alter the feel of a scene. It’s amazing how much difference a bit of color can make in bringing out the personality of each building in your LEGO city.

Mastering LEGO Modular Building Lighting Installation

Getting your LEGO modular buildings lit up can seem a bit daunting at first, especially if you're new to it. But honestly, it's not as complicated as it looks. Think of it like adding the final touches to a painting; it really makes everything pop. The key is to take your time and plan things out a bit.

Witness the incredible transformation of the monumental LEGO® Icons Eiffel Tower (10307) with the official Bright My Bricks light kit. Our video showcases the stunning, warm illumination that brings this 10,001-piece Parisian landmark to life, highlighting every intricate detail from the base to the spire.

Experience the breathtaking glow and see why lighting is the essential final touch for any serious LEGO collector. Our kits are designed for seamless integration, ensuring your masterpiece can shine safely and brilliantly.

Preparing Your LEGO Set for Illumination

Before you even think about plugging anything in, you gotta get your LEGO set ready. This means making sure it's clean – dust bunnies are not friends with tiny wires. You might need to take apart a few sections to run the wires neatly, so do that carefully. It's also a good idea to figure out where all the wires are going to go before you start sticking lights everywhere. Think about hiding them behind walls or under floors where they won't be seen.

  • Plan your lighting layout: Decide which parts of the building you want to highlight.
  • Clean your LEGO set: A quick dusting makes a big difference.
  • Disassemble carefully: Only take apart what's necessary to run wires.
  • Test your lights: Make sure every single LED works before you put it in the build.

"It’s really helpful to have a clear idea of the final look before you start. Sketching it out, even roughly, can save you a lot of hassle later on."

Step-by-Step Integration of Connection Lights

Alright, now for the fun part. Start with the main features you want to light up – maybe the front windows or a cool interior detail. Work from the inside of the build outwards. This way, you can tuck the wires away as you go.


  1. Place the LEDs: Carefully position the small LED lights where you planned. They usually fit right into the gaps between LEGO bricks..
  2. Secure the lights and wires: Most kits come with little sticky pads or clips to keep the lights and wires from moving around. Make sure the wires aren't pinched or pulled too tight.
  3. Connect the wires: Link the LEDs together using the connectors provided. Follow the kit’s instructions closely here.
  4. Hide excess wires: Tuck away any extra length of wire. You can often hide these along the base of the building or behind larger pieces.

The goal is to make the lighting look like it's part of the original build, not an afterthought.

Strategic Placement of Power Sources

Where you put the power source, usually a battery pack or a USB adapter, is pretty important. You want it to be easy to reach so you can turn the lights on and off, but you don't want it sticking out and ruining the look of your LEGO city. Sometimes, you can hide it in the back of the building or even connect it to a power strip that's out of sight. If you're connecting multiple buildings, think about how the power will flow from one to the next without a mess of wires.

  • Accessibility: Make sure you can get to the power switch easily.
  • Discretion: Hide the power source so it doesn't distract from the display.
  • Stability: Ensure it's placed securely so it won't fall off.

Showcasing Popular LEGO Modular Lighting Kits

When you've spent hours, maybe even days, putting together one of those big LEGO modular buildings, you want it to look its best. And honestly, just having it sit there on the shelf is fine, but adding lights? That's a whole different ballgame. It really makes the details pop, you know? Like, you can see the little coffee cups in the cafe or the tiny books on the shelves so much better.


Let's talk about some of the most popular modulars and how lighting can totally change them. It's not just about making things bright; it's about creating a mood, a scene. Think about the LEGO Modular Police Station. With the right lights, you can highlight the brickwork, make the interior look like it's actually got people working late, and maybe even add a subtle flashing light on top. It goes from being a cool model to a mini-scene.


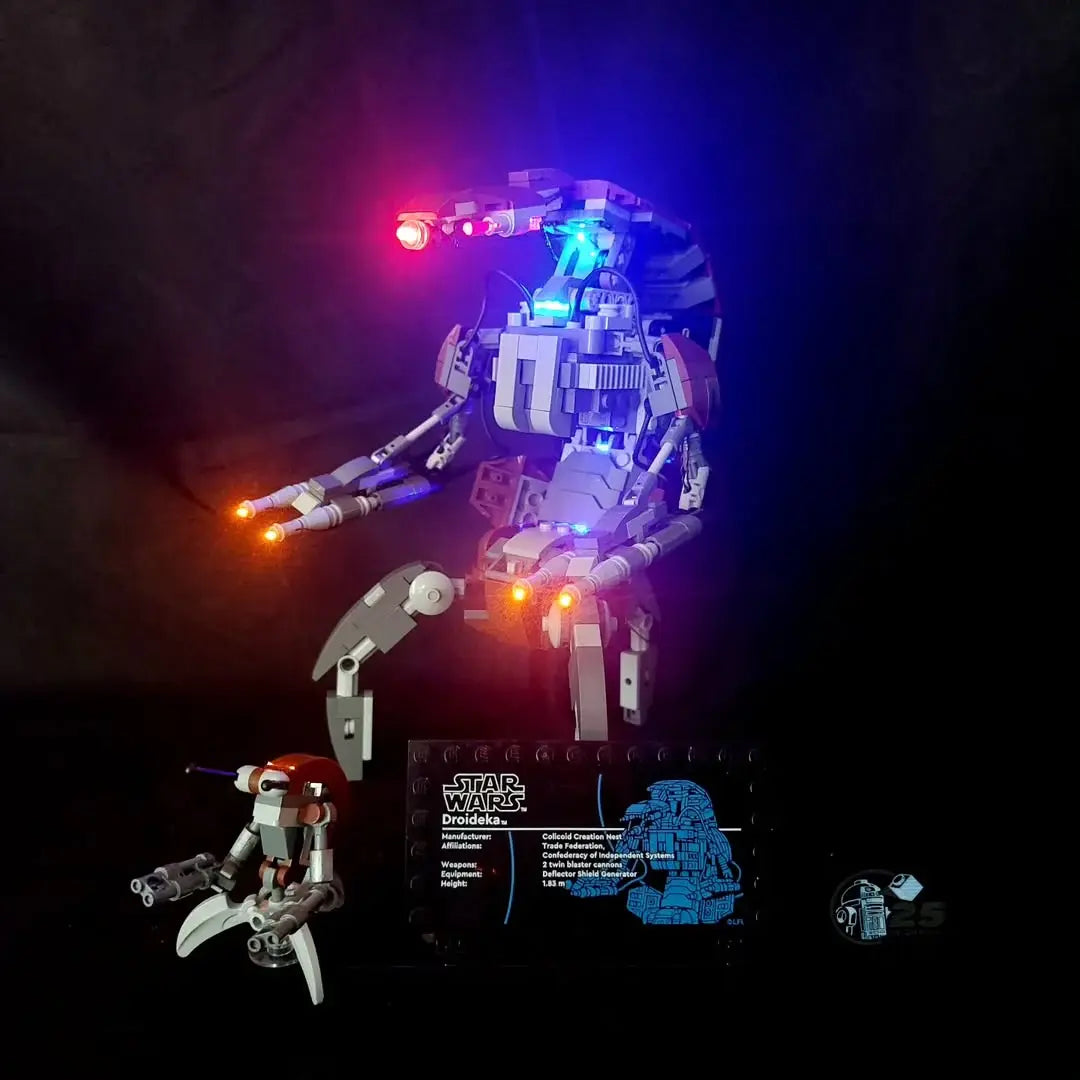
Then there's the LEGO Modular Bookshop. This one's all about charm, right? The lighting kits for this set usually focus on bringing out that cozy, old-fashioned feel. You get warm lights in the windows, maybe a little glow from the apartment upstairs. It makes it feel lived-in, like someone's actually reading a book by lamplight. It’s pretty neat how a few LEDs can do that. I saw a review that said the lights for the BD-1 set really made it look better, and I bet it's the same for these modulars [ba68].


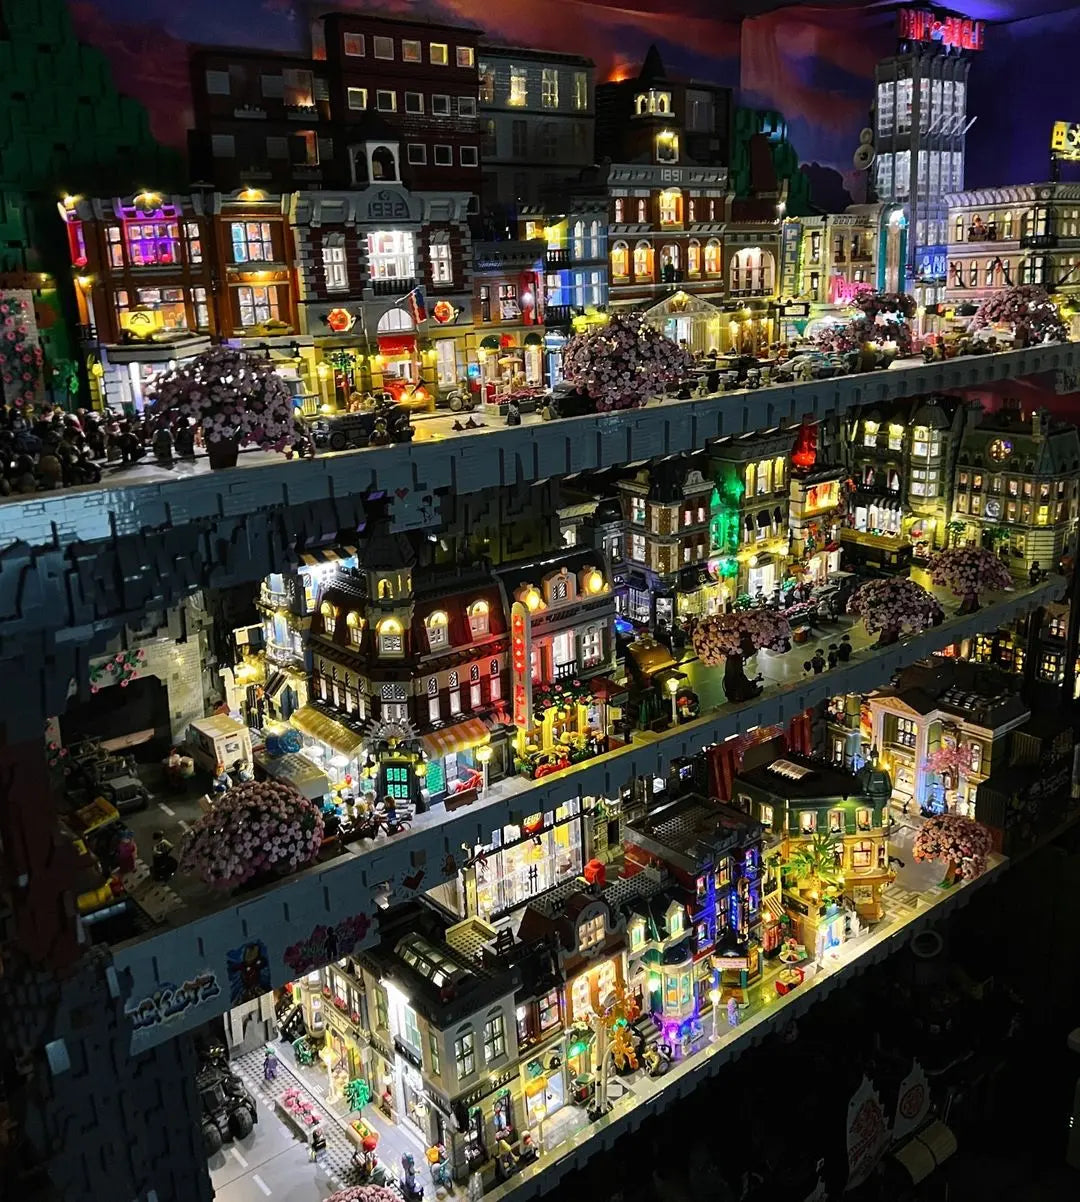
And the LEGO Modular Assembly Square? That's a big one, with lots of different sections. Lighting this set can be a bit more involved, but the payoff is huge. You can light up the bakery, the florist shop, the apartments – each with its own character. It really brings the whole "square" to life, making it look like a busy town center. It’s amazing how much difference it makes.
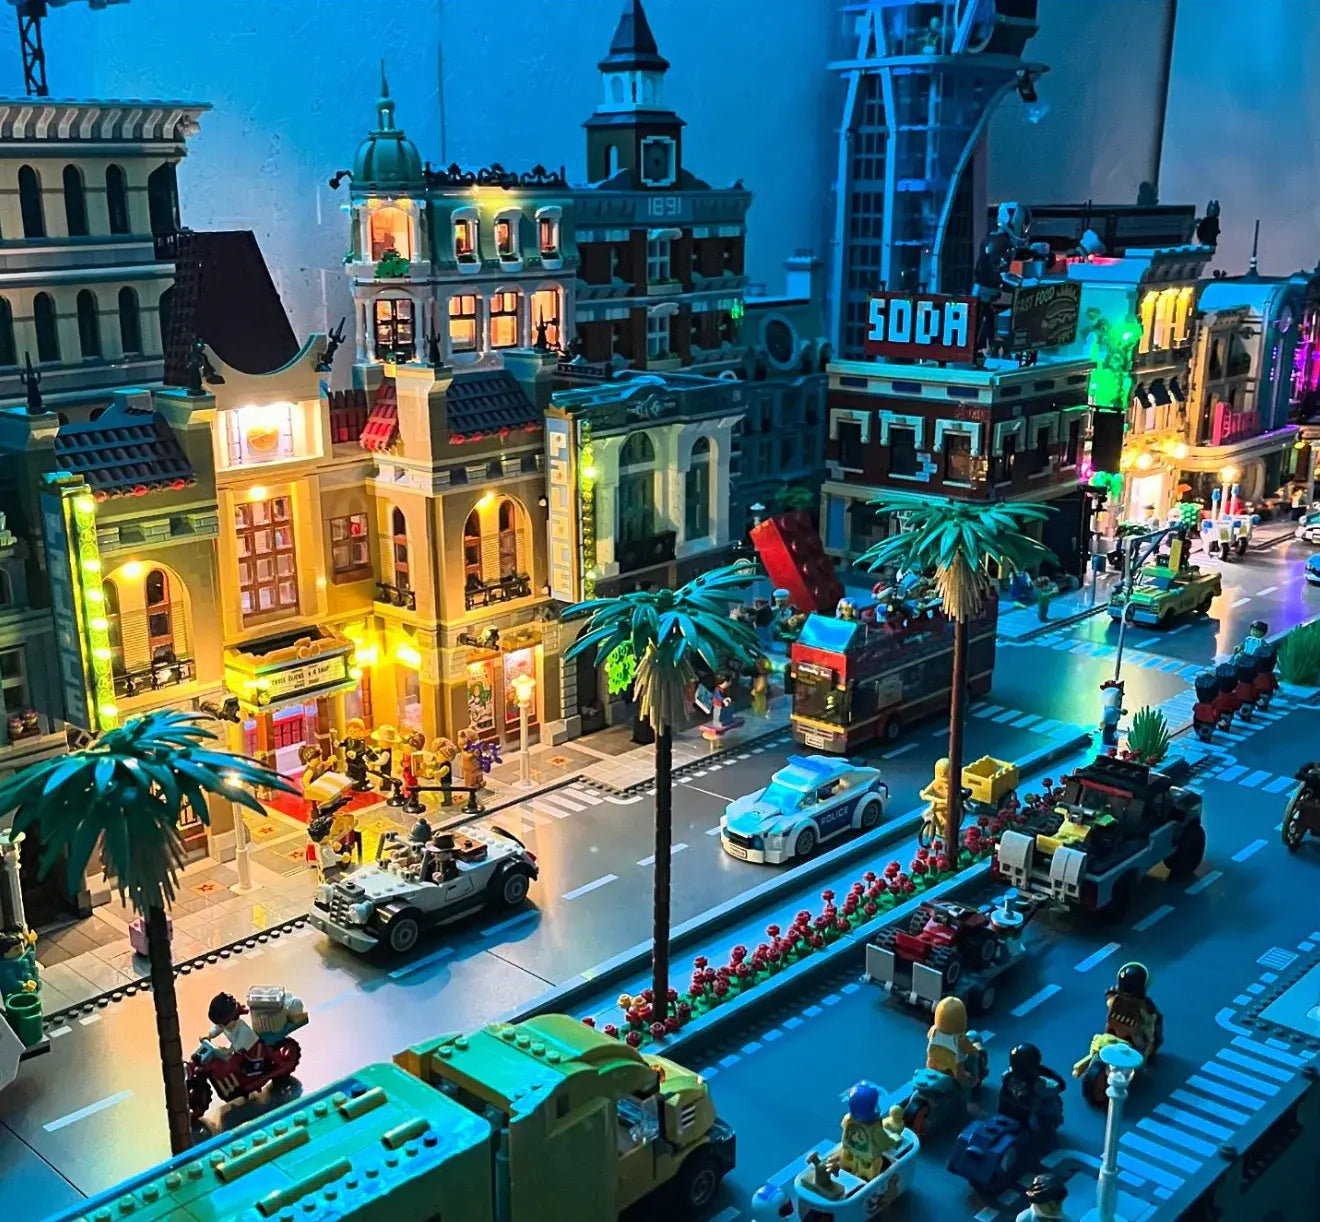
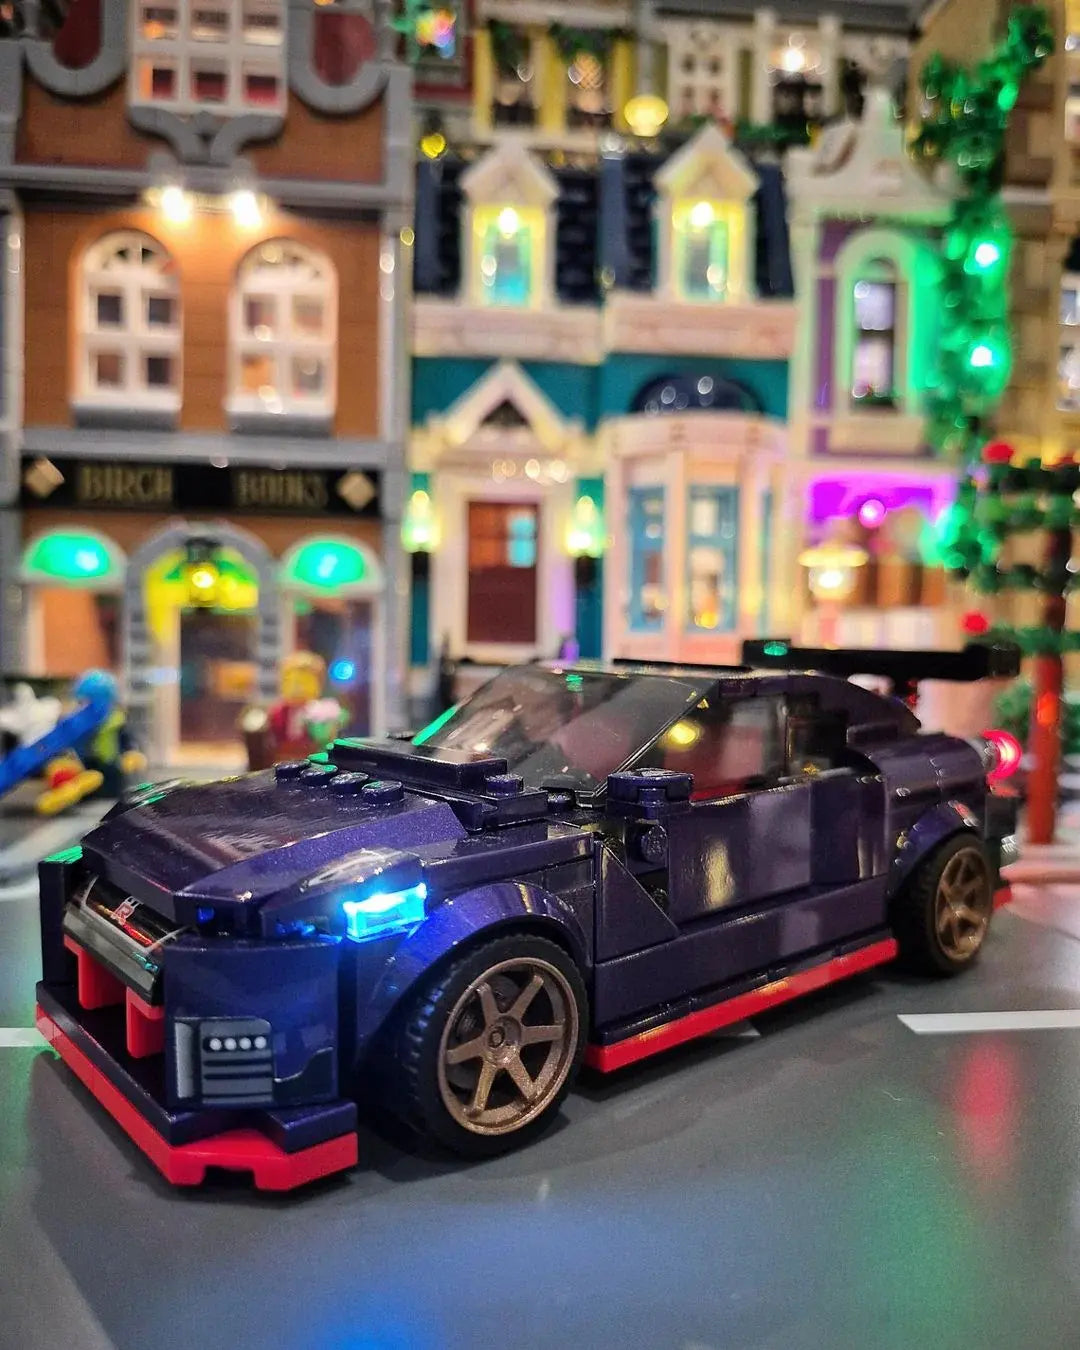
Here's a quick rundown of what to expect:


  • Police Station: Focus on facade details, interior office lights, and maybe a subtle emergency light effect.
  • Bookshop: Warm, inviting interior lights, highlighting the architecture and the cozy reading nooks.
  • Assembly Square: Multiple light points to illuminate each distinct building and create a vibrant street scene.

"Adding lights isn't just a technical step; it's an artistic one. It's about choosing where to place the light to draw the eye and create a specific atmosphere for your LEGO city. It really transforms the display."


Getting the right kit can make all the difference. You want something that fits well, doesn't require you to rebuild half the set, and looks good once it's done. It’s a fun way to personalize your LEGO collection.

Troubleshooting Common LEGO Modular Lighting Challenges

So, you've got your LEGO modular building all set up, lights ready to go, and then... nothing. Or maybe one side is blindingly bright, and the other is barely visible. It happens! Don't let a few hiccups dim your enthusiasm. Most lighting issues are pretty straightforward to fix if you know where to look.

Addressing Lights That Aren't Working

This is probably the most common problem. First things first, check the obvious: is the power source plugged in and turned on? If that's good, then it's time to play detective with the connections. A loose wire is the usual culprit. Gently push on each connection point to make sure it's snug. If a specific light isn't working, try swapping it with one that is. If the problem follows the light, the light itself might be faulty. If the problem stays put, it's likely a wire or a connection point further down the line. Sometimes, the little battery packs can be a bit finicky too, so give that a wiggle.

Achieving Even Illumination

Getting light to spread out nicely can be tricky. You might have one area that's super bright and another that's just dark. This often comes down to how the lights are positioned. Think about where the light source is relative to the LEGO bricks. Sometimes, just shifting a light a stud or two can make a big difference. If your kit came with any little diffusers or frosted pieces, try using those. They can help spread the light out more softly instead of creating harsh hotspots. It's all about finding that sweet spot where the light looks natural and highlights the details you want to show off.

Effective Wire Management Techniques

Wires are the unsung heroes of LEGO lighting, but they can also be the biggest headache. They have a way of popping out where you least expect them, ruining the clean look of your build. The key here is planning ahead. Before you even connect a single light, think about where those wires will go. Can they run behind a wall? Under a floor plate? Sometimes, you can even tuck them into the gaps between bricks. Using those little sticky-back clips that often come with lighting kits can be a lifesaver for keeping wires tidy and out of sight. Just remember to leave a little slack; you don't want wires pulled too tight, or they might disconnect later.


"Don't get discouraged if your first attempt isn't perfect. Troubleshooting is part of the fun, like solving a little puzzle. Take your time, be methodical, and you'll get there."

Advanced Techniques for LEGO Modular Lighting

So, you've got the basics down, and your modular buildings are looking pretty sharp with their new lights. But what if you want to take things up a notch? This is where we get to play with some really cool stuff. It’s all about pushing the boundaries of what your LEGO city can do.

Integrating Technology for Dynamic Effects

This is where things get really interesting. We're talking about adding microcontrollers, like an Arduino, to your setup. This lets you program specific light sequences. Imagine your Assembly Square's lights dimming at night or a specific building's lights flashing when you press a button. You could even hook them up to smart home systems, so you can control your LEGO city's lighting with your voice! It’s a bit more involved, but the results are pretty spectacular. For those who like to tinker, creating a custom app to control everything remotely is also an option.

Designing for Future Modifications

When you're adding lights, especially with more complex setups, it's smart to think ahead. Try to plan your wiring so it's easy to access and modify later. Maybe you want to add more lights to a building in the future, or perhaps you're upgrading to a different type of lighting effect. Keeping your wiring neat and organized, perhaps using small clips or channels, will make these future changes much simpler. It’s like building with LEGO itself – thinking about how it all connects and how you might change it down the line makes the whole process smoother. If you're interested in more complex builds, looking into the LEGO Technic range might give you some ideas about advanced construction methods that could apply to your lighting projects too.

The Benefits of High-Quality LEGO Modular Lighting

When you're putting a lot of time and effort into building those amazing LEGO modular sets, you want them to look their absolute best. That's where good lighting really makes a difference. It’s not just about seeing the details; it’s about making your whole creation pop.

Ensuring Easy and Enjoyable Installation

Nobody wants to spend hours wrestling with tiny wires or confusing instructions. High-quality lighting kits are designed with the builder in mind. They usually come with clear, step-by-step guides, often with pictures, that show you exactly where each wire and LED should go. The wires themselves are typically super thin and flexible, making it easy to tuck them away between bricks without any fuss. This means you can focus on the fun part – seeing your LEGO modular building transform – rather than getting frustrated with the setup. It’s all about making the process smooth and satisfying, so you can get to the admiring stage quicker.

Utilizing Premium Components for Longevity

Let's be honest, LEGO sets aren't cheap, and you want your illuminated display to last. Using premium components, like high-quality LEDs and durable wires, makes a big impact. These aren't the cheap, flimsy lights you might find elsewhere. We're talking about LEDs rated for tens of thousands of hours of use. This means your LEGO Police Station or Bookshop will stay brightly lit for years, even decades, with normal use. Plus, good quality kits often use parallel wiring, so if one tiny LED happens to go out, the rest of your display stays lit. It’s a small detail, but it really matters for the long haul. You can find some great options for LEGO modular building lights at places like Bright My Bricks.

Exploring Versatile Lighting Effects

Beyond just making things bright, quality lighting kits offer ways to get creative. You might want a warm, inviting glow for the windows of your Assembly Square, or perhaps a more focused light to highlight a specific feature, like the entrance to a building. Some kits even offer different color options or the ability to control brightness. This versatility lets you tailor the look of your LEGO city to your exact preferences. You can create different moods for different buildings or even change the lighting scheme for special occasions. It really adds another dimension to your display, making it more dynamic and engaging.

Your LEGO City, Now Glowing

As you can see, lighting your LEGO modular buildings is a simple step with a huge impact. It's the secret to transforming your collection from a display of bricks into a world that feels truly alive. This is the ultimate way to showcase your passion and all the time you've invested in your builds. Ready to make your LEGO city shine?


Explore our complete collection of lighting kits and get started today! Happy building, and happy lighting!

Subscribe

To join our mailing list and never miss a baby update!

Thanks for contacting us. We'll get back to you as soon as possible.

Featured product

Light Kit for LEGO® Icons Boutique Hotel #10297

Title

Trending Articles

Title

Follow us 

FAQs

Got questions? We’ve got answer...

What makes these lights different from regular LEGO lights?

These lights are made just for LEGO modular buildings. They fit perfectly in the special spaces without messing up your model. Regular lights might be too big or not fit right.

Will putting lights on my LEGO modular building break it?

Nope! Our lights fit snugly between LEGO bricks, so you don't have to force anything. You can always take your LEGO building back to how it was before.

Which LEGO modular buildings work best with your lighting kits?

Most LEGO Creator Expert sets made after 2007 work well. Sets like the Corner Garage, Diner, and Haunted House are great choices. Older buildings, like the Café Corner, might need a bit more planning because there's less room inside.

How long do these LEGO modular building lights usually last?

The small LED lights we use can last for over 50,000 hours! If you don't have them on all the time, they'll keep your LEGO building shining for many, many years.

Can you see the wires after you finish putting the lights in?

We use super thin wires that hide really well in the gaps between LEGO bricks, behind walls, or under floors. Your LEGO modular building will still look neat and tidy.

Built by AFOL'S

Share your photos on Instagram and tag @brightmybricks in the caption for a chance to be featured on our website.

Subscribe To Newsletter

Join the best newsletter that you never knew you needed. You'll get 3 emails per week new blog posts, product launches, giveaways, and motivation to help you Keep on Growing.

Thanks for contacting us. We'll get back to you as soon as possible.

Our Newsletter

Sign up for the latest Ice offers and exclusives

Thanks for contacting us. We'll get back to you as soon as possible.

© 2025 Bright My Bricks all rights reserved. LEGO® is a trademark of the LEGO Group of companies which does not sponsor, authorize or endorse this site.